Sunday, October 18, 2015

Pololu Zumo Based Rover Build

Here is the finished bot:

Arduino Mega mounted vertically on a slab of scrap wood


I got the first Zumo based robot built and running this evening.  For some reason, I decided to mount the arduino and h-bridge vertically on a slab of wood, then mounted the wood to the chassis.  This wasn't hard.  I had the most trouble with re-soldering the wire leads to the motors and I may have damaged one of the motors in the process.

Once I got the bot mostly working, I loaded the rover bot code.  I had no trouble getting the code to run on the arduino mega (clone).  

In general, the Zumo track driven chassis and motors show promise in getting a small bot over wood floors and rugs.  I hope to swap out the motors soon, then focus on programming the bot.  I also need to mount the radio, wheel encoders, and compass.  And, it needs lights, lots of blinking lights.

More about the build here


arduino on left, h-bridge on right -- mounted on a scrap of wood


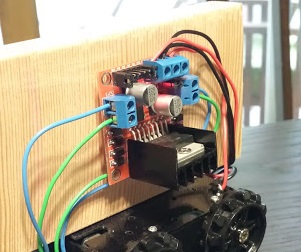
h-bridge mounted with thick 2 sided tape


4x AA batteries below the bot

 
can't wait to race

Random Notes:

  • I attached a chunk of scrap wood vertically to the Zumo chassis
  • I used double-sided tape to mount the arduino, range finder, and h-bridge to the wood 
  • Pololu 100:1 metal gear motors
    • tiny
    • 1 of 2 motors not working well, the gears drag and make buzzing noise
    •  robot pulls hard left
      • I had trouble with intermittent noise and drag with the left Pololu 100:1 metal gear motor
      • I'm guessing this is a mechanical problem with the gears.
      • I had to replace the wires that I originally soldered to the motors
        • de-soldering was difficult. yuck
        • may have damaged motor?
    • The new thicker wires are good, but block the battery door
    • batteries have dropped out when the bot goes over bumps
    • I will try swapping out the 100:1 motors with 50:1 ones that I have

  • Voltage issue (may be related to left motor)?
    • seems like the bot doesn't get consistent power.  
    • The sticky motor may drag the voltage down.
    • it seems like there is some kind of voltage problem, 
    • perhaps loose wires
    • shaking wires around h-bridge seemed to match changes in motor performance
    • bot worked well when plugged into usb or with the 9v battery (later mounted on top)


Building a Small Rover for the House

A Small Rover for the House

I've been looking for a good platform to build a small rover that explores our house.   The previous "turtle" platform built in September did not seem to be up to the task.  The plastic geared motors are slow and weak.  The wheels slipped and had a hard time both with the wood floors and the area rugs.  Problems with the wheels and gears meant the rover would not move predictably, making it difficult to program.  I needed a small bot with good motors, encoders to measure wheel movement, and a digit compass to check the bot's orientation.

At some point recently, Pololu caught my attention.  I had considered their line-following PI bot, but became interested in the Zumo after seeing Adafruit's amazing bot that chases colored balls, which is built on a Zumo platform and an Arduino and . 


Pixy Pet Robot: chases red ball (image:AdaFruit web site)


For now, I need something that can drive on wood floors with area rugs.  It needs to be able to move from room to room without getting stuck.

Zumo Chassis with Arduino


Parts

  1. Pololu Zumo chassis kit with wheels, tractor tread, battery compartment
  2. Pololu 100:1 metal gear motors 
  3. L298N-Dual-H-Bridge
  4. Arudino Mega 
  5. HC-SR04 ultrasonic sensor
  6. NRF24L01 radio transceiver
  7. HMC5883L digital compass
 

 Zumo Platform


So, I'm building a Zumo based rover bot.  I'm starting with just chassis and tiny 6V motors with metal 100:1 gears from Pololu.  The plastic chassis kit is compact and smart and includes everything a small robot needs including wheels, tracks, battery holder with door, motor holders, and a small platform for mounting the rest of the bot gear.

I plan to build the rest of the bot with existing parts, including h-bridge, controllers, transceiver, sensors and software.

H-Bridge

A robot needs an h-bridge to control the flow of electricity to the motors.  The robots controller uses the h-bridge to send power to the motors driving them fast, slow, forward, reverse. 

My L298n h-bridge is big and bulky.  At this point, I wish I had the flat $25 Pololu shield.  

Controller

A robot needs a controller to check input and direct devices like motors, lights, and screens.  Controllers are simple computers with a programmable CPU mounted on a board with ports for sensors and devices.

I plan to use an Ardino Mega.

Transceivers 

Transceivers allow the robot to communicate with other devices.  Driving a robot by remote control requires a device to send and a device to receive.  I want my bot to check-in with the Raspberry PI based house server.

I intend to use a NRF24L01 radio transceiver.  They are cheap, short range, communicators that are easy to work with.

Sensors  

Robots need sensors for navigation.  A house rover needs to be able to navigate floor plans and furniture.  They use range finders, tilt sensors, compasses and even beacons like GPS to figure out their location.

I will use a HC-SR04 ultrasonic sensor, cheap and easy.
I will mount a board that includes a HMC5883L digital compass. 

Software

Controller programming is expressed in start and loop functions, where the start function 'boots' the device and the loop function continuously runs tasks to collect sensor data, make calculations, and drive devices over and over again. Programming is physical, real-time, event based and coded in C using the Arduino IDE.  I've been experimenting with state machines with event transitions.

Someday

I would like a rover bot that can navigate our house and interact with the Raspberry Pi house servers.